Below is a recommended algorithm for setting the "OPC DA-client" protocol driver.
1. If the OPC server is located remotely, you must first configure DCOM according to the instructions in the special section of the help system.
2. It is recommended to connect to the OPC DA server with a test DA client, such as Matrikon OPC Explorer. If this client succeeds in making the connection, you can proceed to configuring the driver.
3. Add a node to the configuration, add a device to it. Click the button in the OPC DA server field - the Search for installed OPC servers window will start.
4. In the OPC server search window, select the desired OPC server. If the OPC server is located remotely, click the Microsoft Windows Network section to search for available OPC servers over the network. In this case, the OPC server will be found only if DCOM is properly configured and the OPCEnum service (included in the OPC Core Components) is installed and running on the remote computer.
5. If the search failed to find the OPC server (for example, due to incorrect settings of the OPCEnum service), it is possible to specify the connection to it manually. To do this, enter the format string in the connection field:
10.0.100.10\InSAT.ModbusOPCServer.DA\\{F5EB9AFF-96EA-403F-B129-65235F8BB8B8}
Where:
10.0.100.10 - The IP address of the remote computer.
InSAT.ModbusOPCServer.DA - OPC server name.
{F5EB9AFF-96EA-403F-B129-65235F8BB8B8} - CLSID.
There are several ways to determine the server name and its CLSID. The easiest way is to install Multi-Protocol locally on that computer, search for the OPC server (and tags), transfer the configuration to the target machine, and add the computer's IP address at the beginning of the connection string.
If third-party software installation is not possible, you can get the parameters using a third-party OPC client, for example you can use OPC Test Validator - this client does not require installation and third-party components, just run the EXE file. Run this client locally with the OPC DA server, press Servers - Connect to Server, select the server you want and press Connect Server. At the bottom of the server will be added, call its context menu - Server Registry Settings.
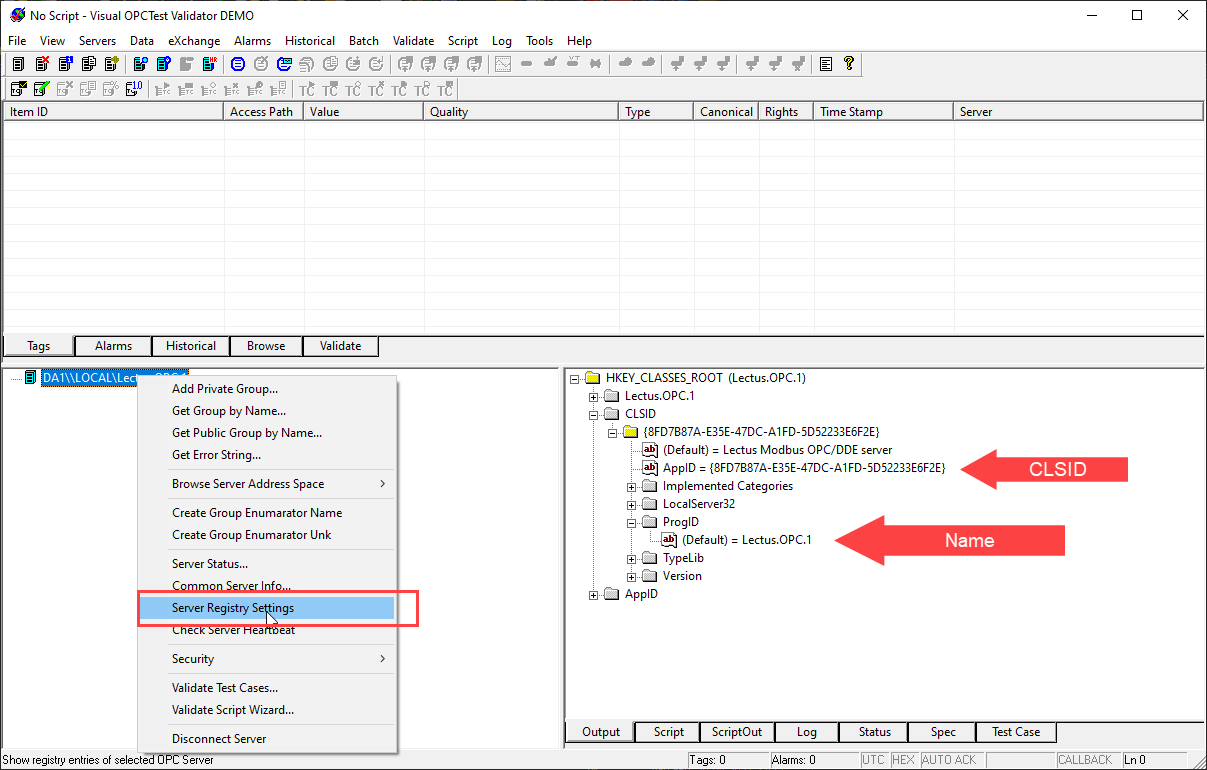
In the CLSID section of the tree that appears, find AppID - this will be CLSID, and ProgID - this will be the name of the server. With a mouse click, you can put these fields in edit mode and copy the contents.
Form the connection string to the server from the data fields and IP and paste it in the connection window of the OPC server in Multi-Protocol.
6. Close the OPC DA server connection window by clicking OK.
7. At the device, call contextual and select Protocol tags (import) - the tag import utility will open. If the server has a lot of tags and you need only some of them, it is recommended to leave the flag "Interactive" on - in this case the tags will be loaded as the tree unfolds. If there are not many tags, you can remove the flag and then all tags will be read and displayed in the tree.
8. First it is recommended to add 1 tag and press OK. Run the execution mode and check if the tag is read. If everything is correct - stop the execution mode, and add the remaining tags.
9. If reading tags does not happen, try changing the "Interrogation type" setting from "Periodic poll" of changes to "Synchronous reading" - perhaps the server does not support subscription mode.
10. If after changing the type of polling still does not go, then highlight the device in runtime mode and go to the tab "Scripts and drivers messages". If there will be the message "Failed to connect to OPC Server Error - 0x80040154", then this error occurs when the 64-bit version of Multi-Protocol accesses the 32-bit server (it does not always happen). Try to install the 32-bit version of Multi-Protocol and check with it.